To put a price on a thing is an odd thing to do.
I've never sold my photographs. I'd dreamt of doing a photo exhibition. I wanted to do more than show them only to take them home afterwards. I wanted to do something good along with it - to auction them and raise money. I didn't know what putting a price on one would feel.
But before I wade into my moral dilemma, let me thank the people without whom this wouldn't have been possible - Kavita, Tharak, Kritika, Pooja & Vivek. These five people were the hands, feet, brains, heart and occasionally filled in for all the other organs that were needed. Kavi was the mastermind of this project. I might've taken the photographs but she put on this show. Tharak for all the posters & the artwork in the coffee table book. But my gratitude really goes out to the last three, who flew in from Delhi & stayed the whole week to help!
Back to my dilemma. It wasn't as if people were paying for the photographs. They were paying for a visually impaired student's future & education - that this framed photo was merely a glorified thank you card, from me to you, all paid-for by me. But it did feel like I was making a sale.
Until that point in my life, I'd marked a large number of my photos online as CC-BY. All anyone needed to do was connect my photo to the original upload & use it as they please. They ended up on song cover art, safari brochures, treehugger articles, wikipedia and god knows where else. And if I cared, it was only to know that they were of use to someone.
As an auctioneer, I was conflicted. I wanted to give everyone the picture they liked, but I had to push the price up for the cause. Bidding wars may push the price up, but they do so by denying someone their wish to take the photo home. I wasn't happy to call up someone and tell them they weren't getting their photo of choice - I wanted to prevent people from outbidding others. At the same time, I wanted to hit my fund raising target.
I felt like I was the bad person here, keeping people from having what they want - for money. Generating artificial scarcity for something that was still available at no cost - I felt like I had sold out. Felt like I was doing something morally wrong, cheapening the sensation of having raised a whopping 1.3 lakhs for mitrajyothi. I might be feeling a bit low about the auction, but that money is going to go do a lot more good to a lot more people. But I do have something to re-iterate about my photos and your right to enjoy them.
My Creative Commons photos have always been available for anyone to download - use one as your wallpaper, take a print & frame it or paint a copy.
Just leave a comment or something, so that I have a reason to keep uploading more.
--The essence of all art is to have pleasure in giving pleasure.
-- Dale Carnegie
I love Bokeh. Nothing stands out more in a portrait or a macro photo than the bokeh and the shallow DoF you can get out of a wide aperture lens. Here's a quick tutorial on how I managed to add to the effect of bokeh with some cheap carboard, masking tape and a bit of math.

The idea is to mask out the light from distant sources, without masking out the close up objects at all. The lens is designed such that the distant object light rays hit the lens and form large circles of light, instead of points as the beams focus before the sensor and diverge out into blurs. The math involved in designing the lens hood is to actually cut off some of the distant beams while retaining all the close object beams.
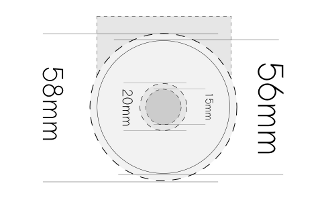
This is drawn roughly from a 50mm f/1.8 Nikkor. Anything covering the internal 15mm would block closer objects , but everything within the 20mm (approx) ring would only block distant objects. So anything you could punch out between those, would form a neat and clean bokeh image.
After trying to remember enough of 1st year engineering drawing, in my attempt to draw a heart with a 5mm tolerance, I gave up. Instead, I just took a print-out (A4) of something I could easily draw on a computer. Here's an easily printable PDF, in case you want to try it out on your own.

Here's how my Mk1 version looked like. I eventually ended up making a more collapsible version nearly completely out of duct-tape, which is far uglier, but has a slot in the top to slide in different filters. The tube collapses, making it slightly squarer and the pdf has the pull-tab version that the Mk2 uses.
Update: Someone pointed out that today's flickrblog covers this exact topic ... *ugh*, I'm an hour late. But at least, the PDF should come of some use to the lazier of you :).
--It was fun because it's something we normally wouldn't do.
-- Misty May
posted at: 03:11 | path: /tutorials | permalink |
Spend every day watching your life pass you by. The days, they go on interminably without any identity of their own. Your thoughts become memories, turn into dreams and fade away like breath on a window pane.


Freeze a moment in time, store them away and chase them back down memory lane. Lay down the breadcrumbs marking your way, mementos held close to your heart, of a day that you'll never forget.
Click, *click* ... and that's all it took.
--The moving finger writes; And having writ, moves on.
The writing, it stays written.
As much as I'd like to pretend to be one, I'm not a real photographer. Photographs are secondary to the experience - travel, laughter, people and memories. But sometimes I do give in and take a photo which requires patience, time and often, post-processing. Saturday night, I decided to prepare, polish and publish one of those.
Basic Tools: For stitching images the workflow involves three tools Hugin, autopano-sift and Enblend. All these tools are available with most popular distributions - apt-get install should do just fine.
The input to the tools are six photos taken with my trusty SD450. They have been taken with nearly identical modes with a Manual setting to prevent the camera from adjusting between pictures (forgot to turn off auto white-balance for this set). The camera has a panorama mode which allows me to fairly accurately align multiple pictures with enough overlap, but that's not really as useful as you might think.
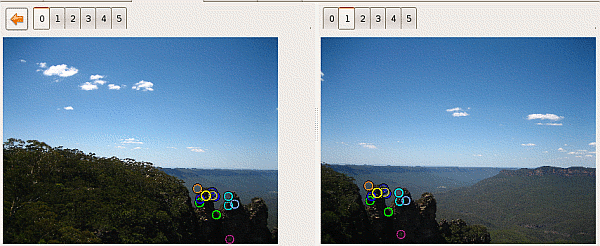
Autopano: First step in creating panoramas is to identify common points. Autopano is an automatic image analysis tool which can identify common areas between photos. The command autopanog should get you the UI required to load all the photos. Other than checking absolute paths, there is nothing else that I found useful to tweak there. Autopano after computation throws out a .pto file which is then pushed onto the next tool.
Hugin: Hugin does all the further magic. After loading in the PTO file, select the image required to be the anchor or reference image of the panorama and anchor that image for position. It does really help if the horizon is horizontal for that picture. Thankfully, Hugin can actually read the EXIF data from the images to obtain information about the lens, field of view and other details which I wouldn't know how to provide. The next tab shows the data gathered by autopano in an editable view, to adjust the control points if required.
Rather than waste much time there, head over to the next tab and click on Optimize now!. It should result in Hugin working most of its miracles, in mysterious ways to perform, by realigning shearing and doing all the other important things required. About time, we got a preview of whatever is going to be the result. One of the curious behavioural defects of the tool is that the preview does not update unless manually initiated. I've wondered a couple of times about why the picture looks exactly the same whatever I do. But here's how it looks right now.
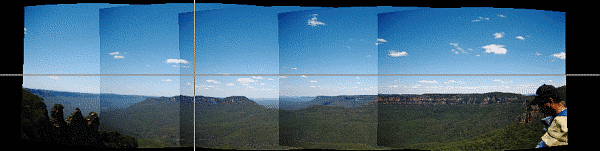
As it is very obvious, the camera's vignetting comes into play for the corners of all the images. Merely placing the layers above each other will not produce a satisfactory panorama. Therefore, rather than combine images inside Hugin, the output from this phase has to be the correspondingly distorted seperate images. So in the last tab, calculate the field of view, the optimal size and select the "Multiple TIFF" (cropped) output option. This gives us individual images which look somewhat like these (hmm... my ICC settings are off in these screenshots).
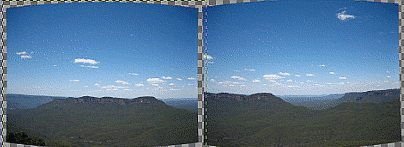
Enblend: Enblend does exactly what its name suggests. It can blend between images, performing a smooth transition between the frames to create a good looking panorama. Merely pass in all the images in order via the command like to enblend and it does the job neatly (but watch your CPU load). The blended image is not equirectilinear and requires cropping to create a rectangular image. Mine threw out a whoppingly large 161 MB uncompressed TIFF (12335x3438) file. After scaling it down, converting to JPG and re-inserting EXIF data, the image is ready for the world to see.

And that's the way it's done - only five months too late :)
--Just because you can explain it doesn't mean it's not still a miracle.
-- Terry Pratchett, Small Gods
posted at: 09:11 | path: /tutorials | permalink |