As much as I'd like to pretend to be one, I'm not a real photographer. Photographs are secondary to the experience - travel, laughter, people and memories. But sometimes I do give in and take a photo which requires patience, time and often, post-processing. Saturday night, I decided to prepare, polish and publish one of those.
Basic Tools: For stitching images the workflow involves three tools Hugin, autopano-sift and Enblend. All these tools are available with most popular distributions - apt-get install should do just fine.
The input to the tools are six photos taken with my trusty SD450. They have been taken with nearly identical modes with a Manual setting to prevent the camera from adjusting between pictures (forgot to turn off auto white-balance for this set). The camera has a panorama mode which allows me to fairly accurately align multiple pictures with enough overlap, but that's not really as useful as you might think.
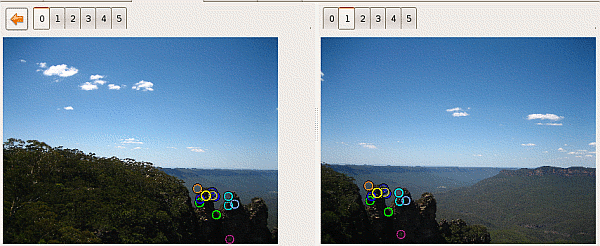
Autopano: First step in creating panoramas is to identify common points. Autopano is an automatic image analysis tool which can identify common areas between photos. The command autopanog should get you the UI required to load all the photos. Other than checking absolute paths, there is nothing else that I found useful to tweak there. Autopano after computation throws out a .pto file which is then pushed onto the next tool.
Hugin: Hugin does all the further magic. After loading in the PTO file, select the image required to be the anchor or reference image of the panorama and anchor that image for position. It does really help if the horizon is horizontal for that picture. Thankfully, Hugin can actually read the EXIF data from the images to obtain information about the lens, field of view and other details which I wouldn't know how to provide. The next tab shows the data gathered by autopano in an editable view, to adjust the control points if required.
Rather than waste much time there, head over to the next tab and click on Optimize now!. It should result in Hugin working most of its miracles, in mysterious ways to perform, by realigning shearing and doing all the other important things required. About time, we got a preview of whatever is going to be the result. One of the curious behavioural defects of the tool is that the preview does not update unless manually initiated. I've wondered a couple of times about why the picture looks exactly the same whatever I do. But here's how it looks right now.
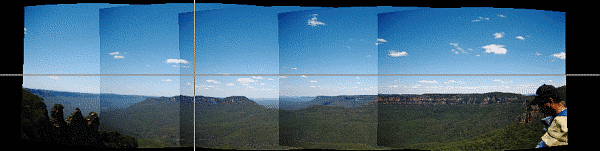
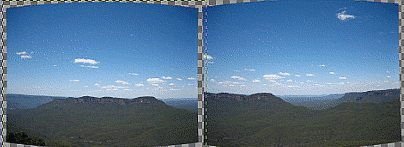
As it is very obvious, the camera's vignetting comes into play for the corners of all the images. Merely placing the layers above each other will not produce a satisfactory panorama. Therefore, rather than combine images inside Hugin, the output from this phase has to be the correspondingly distorted seperate images. So in the last tab, calculate the field of view, the optimal size and select the "Multiple TIFF" (cropped) output option. This gives us individual images which look somewhat like these (hmm... my ICC settings are off in these screenshots).
Enblend: Enblend does exactly what its name suggests. It can blend between images, performing a smooth transition between the frames to create a good looking panorama. Merely pass in all the images in order via the command like to enblend and it does the job neatly (but watch your CPU load). The blended image is not equirectilinear and requires cropping to create a rectangular image. Mine threw out a whoppingly large 161 MB uncompressed TIFF (12335x3438) file. After scaling it down, converting to JPG and re-inserting EXIF data, the image is ready for the world to see.

And that's the way it's done - only five months too late :)
--Just because you can explain it doesn't mean it's not still a miracle.
-- Terry Pratchett, Small Gods
posted at: 09:11 | path: /tutorials | permalink |