I love Bokeh. Nothing stands out more in a portrait or a macro photo than the bokeh and the shallow DoF you can get out of a wide aperture lens. Here's a quick tutorial on how I managed to add to the effect of bokeh with some cheap carboard, masking tape and a bit of math.

The idea is to mask out the light from distant sources, without masking out the close up objects at all. The lens is designed such that the distant object light rays hit the lens and form large circles of light, instead of points as the beams focus before the sensor and diverge out into blurs. The math involved in designing the lens hood is to actually cut off some of the distant beams while retaining all the close object beams.
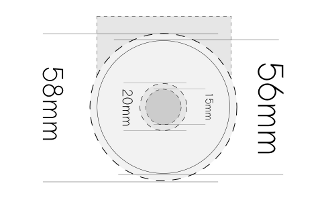
This is drawn roughly from a 50mm f/1.8 Nikkor. Anything covering the internal 15mm would block closer objects , but everything within the 20mm (approx) ring would only block distant objects. So anything you could punch out between those, would form a neat and clean bokeh image.
After trying to remember enough of 1st year engineering drawing, in my attempt to draw a heart with a 5mm tolerance, I gave up. Instead, I just took a print-out (A4) of something I could easily draw on a computer. Here's an easily printable PDF, in case you want to try it out on your own.

Here's how my Mk1 version looked like. I eventually ended up making a more collapsible version nearly completely out of duct-tape, which is far uglier, but has a slot in the top to slide in different filters. The tube collapses, making it slightly squarer and the pdf has the pull-tab version that the Mk2 uses.
Update: Someone pointed out that today's flickrblog covers this exact topic ... *ugh*, I'm an hour late. But at least, the PDF should come of some use to the lazier of you :).
--It was fun because it's something we normally wouldn't do.
-- Misty May
posted at: 03:11 | path: /tutorials | permalink |